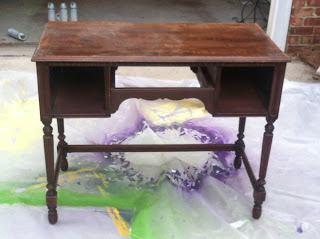
after spending a few hundred dollars on stuff for the house, i decided this wasn't a necessary purchase, and that some day down the road i would take on this project. cue my mom moving from a 4,000 square foot house to a 1,600 square foot house. woman has more furniture than she knows what to do with! so she passed along this little table that used to live in her living room.
first things first, one of the legs was broken off. so i took the leg to lowes and bought a dowel & some wood glue. next step was drilling out the broken dowel out of the leg & out of the table. (i should note i did this after my step dad told me this was what i needed to do - i had no idea on my own.) this was no easy task. i let the wood glue dry overnight & prayed it would actually stick together - it did!
so step 1 (if you have a normal 4 legged table): sand the table down. i used those little sanding squares that we picked up at lowes.
step 2: use a tact cloth to wipe down the table. this removes all the dust particles from the sanding so they don't get stuck on the table during the painting. i had no idea what a tact cloth was prior to this project - you can find it next to the sanding stuff.
step 3: remove all drawers and all of the hardware from the drawers.
step 4: prime the table. we used a valspar primer and did 2 coats.
{after 1 coat}
{2 coats}
step 5: paint. again, we used a valspar gloss paint. it is the best spray paint ever and i highly suggest using it. after all, i am now a spray paint queen.
step 5: attach the wine glass racks. this was something i came across on my bar cart search a few months ago. i found them at the container store for $5.99 each. so i picked up 4 but only ended up having room for 1 on each side. it was simple to attach these - just had to use smaller screws so they didn't go into the drawers.
step 6: re-attach hardware and voila! i love it. this opened up some cabinet space for us. we are using one drawer for all our koosies and the middle drawer for wine & beer openers. i am thrilled with how it turned out - all for about $40 dollars.


awesome job!! i absolutely love the owl :)
ReplyDeletethanks so much! once i post the pictures of our whole house, you'll laugh at all our DIY projects. we got a little carried away!
Delete